9 分钟
【持续更新】网络代理
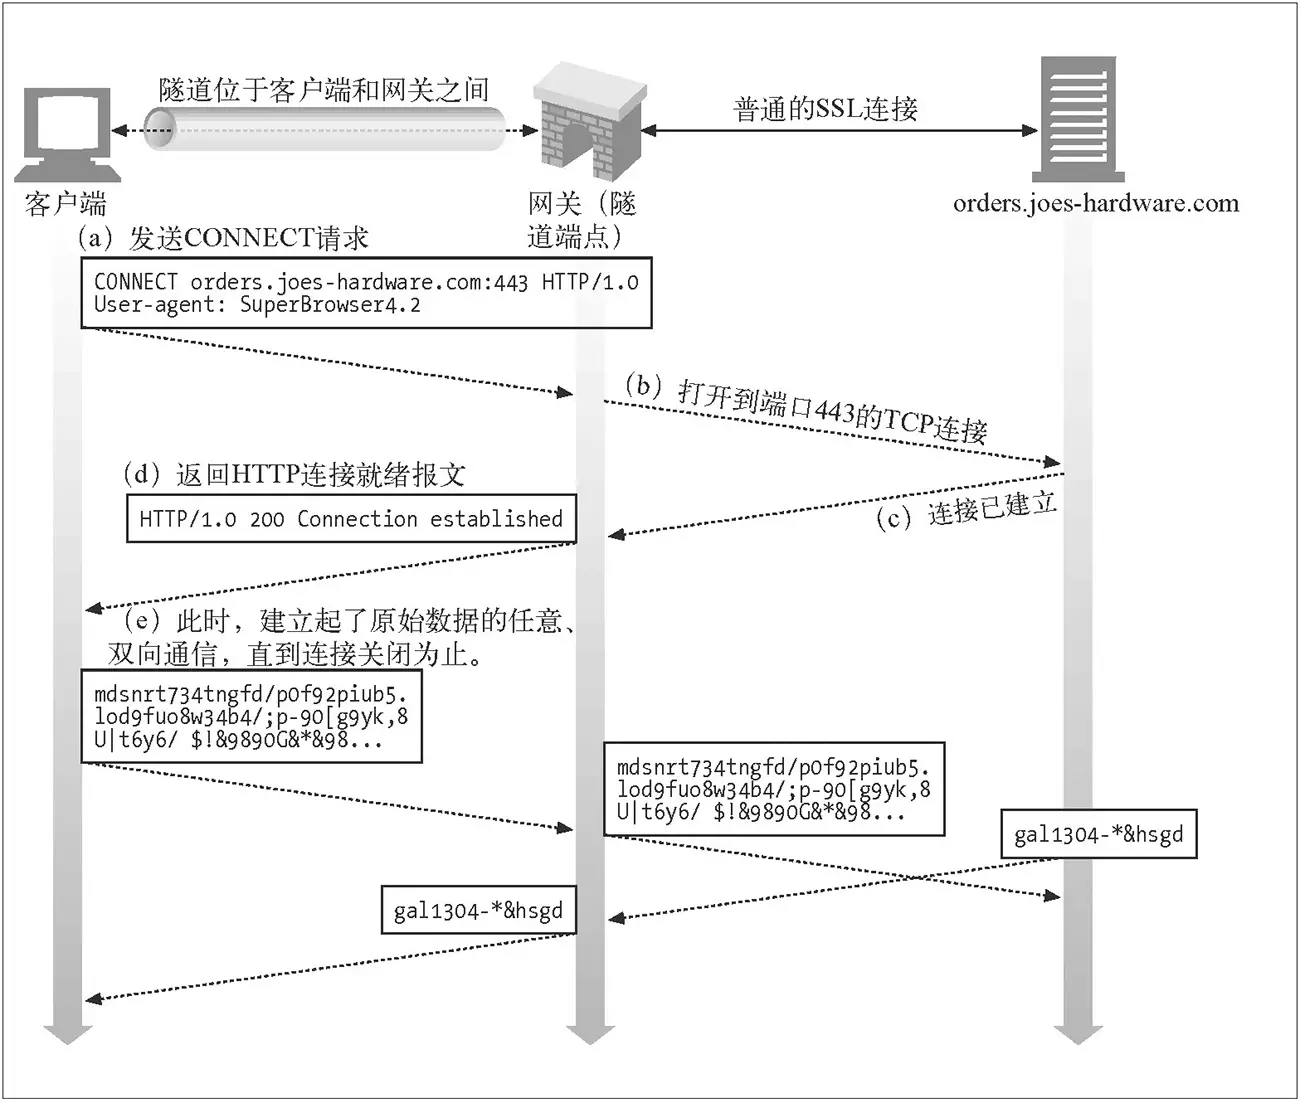
HTTP Tunnel
Wiki: HTTP隧道,又称 “HTTP 正向代理”。
原理
参见:博客
利用 HTTP 协议标准的 CONNECT 方法实现的。
特性
- 同时支持 HTTP / HTTPS
- 支持多级代理
- 基于 HTTP 协议原生支持
- 需要客户端显示的配置
- 只适用于临时局部的代理,不推荐用于全局代理(即通过
http_proxy全局变量的形式)
客户端
- Unix 命令行:通过
http_proxy、https_proxy、no_proxy环境变量设置(全大写也可以)。 - 操作系统:网络 -> 代理配置进行配置
- 软件层面:设置 -> HTTP Proxy
- 编程语言 HTTP Client:搜索
XXX HTTP Client Proxy,XXX为 编程语言名(一般情况下会默认识别 Unix 命令行的环境变量)
注意:http_proxy、https_proxy、no_proxy 环境变量一种松散的业界约定俗称,并没有统一强制的规范,所以极度不统一,并且不是所有命令行工具和各个编程语言的客户端都支持的。下面表述一些工具和库的情况:
- Linux 下的 wget 和 curl 支持后文描述的所有格式:
http_proxy该环境变量的值,其兼容性下:http://proxyHost:proxyPort一般所有的工具/库都支持proxyHost:proxyPort一般所有工具/库都支持http://user:password@proxyHost:proxyPort很多工具/库不支持
https_proxy该环境变量的情况和http_proxy类似即可以配置为http协议的代理服务,但是需要注意的是:http://proxyHost:proxyPort形式,很多 nodejs 的 http 客户端默认不支持,因为在 nodejs 社区认为 https over http tunnel 不安全,如果希望不报错,需要手动配置 proxy,并指定strictSSL为 false 才允许。https://proxyHost:proxyPort这要求代理服务器支持 https,不太清楚其兼容性,。
no_proxy该环境变量的值,一般情况下是用逗号分隔的host列表,其兼容性如下:- 部分工具/库直接不支持识别该环境变量
example.com一般支持no_proxy环境变量的工具/库都支持,但是作者理解可能不一样:- nodejs axios、curl、wget 认为:严格匹配,即
abc.example.com匹配不上,所以仍然进行代理。 - nodejs request 认为:匹配所有子域,即
abc.example.com会匹配上,不进行所以不进行代理。
- nodejs axios、curl、wget 认为:严格匹配,即
.example.com只有部分库支持:- nodejs axios、curl、wget 认为:匹配所有子域,即
abc.example.com会匹配上,不进行所以不进行代理。 - nodejs request 不支持该语法,且,只要存在该形式,其认为
no_proxy非法,这个no_proxy都不生效。
- nodejs axios、curl、wget 认为:匹配所有子域,即
1.2.3.4IP 地址,多数库工具支持。10.0.0.0/24网段格式,部分工具/库支持。
服务端
tinyproxy
官网:tinyproxy
编译安装
参考:博客
(推荐)
# 下载源码
# 前往 https://github.com/tinyproxy/tinyproxy/releases 获取连接
wget https://github.com/tinyproxy/tinyproxy/releases/download/1.11.0/tinyproxy-1.11.0.tar.gz -O tinyproxy.tar.gz
tar -xzvf tinyproxy.tar.gz
cd tinyproxy-*
# 安装编译依赖
yum install -y gcc
# 编译安装
./configure
make
make install
配置开启自动启动 vim /usr/local/etc/tinyproxy/tinyproxy.conf
# 将下面直接注释掉,允许所有ip访问
#Allow 127.0.0.1
#Allow ::1

# 设置用户名密码
BasicAuth username password

# 顺便将下面两行取消注释,后面有用到
PidFile "/usr/local/var/run/tinyproxy/tinyproxy.pid"
LogFile "/usr/local/var/log/tinyproxy/tinyproxy.log"
创建 service 文件 vi /usr/lib/systemd/system/tinyproxy.service
[Unit]
Description=Startup script for the tinyproxy server
After=network.target

[Service]
Type=forking
PIDFile=/usr/local/var/run/tinyproxy/tinyproxy.pid
ExecStart=/usr/local/bin/tinyproxy -c /usr/local/etc/tinyproxy/tinyproxy.conf
ExecReload=/bin/kill -HUP $MAINPID
KillMode=process

[Install]
WantedBy=multi-user.target
准备数据目录
mkdir -p /usr/local/var/run/tinyproxy
mkdir -p /usr/local/var/log/tinyproxy
touch /usr/local/var/log/tinyproxy/tinyproxy.log
touch /usr/local/var/run/tinyproxy/tinyproxy.pid
配置开机自启
systemctl enable tinyproxy
systemctl start tinyproxy
systemctl status tinyproxy
包管理器安装
(不推荐,版本可能过旧)
# CentOS / EPEL / Fedora
yum install tinyproxy
# Debian / Ubuntu
apt-get install tinyproxy
# openSUSE
zypper in tinyproxy
# Arch
pacman -S tinyproxy
# Mac
brew install tinyproxy
配置项
vim /etc/tinyproxy/tinyproxy.conf (编译安装路径为 /usr/local/etc/tinyproxy/tinyproxy.conf)
# User/Group: 设置 tinyproxy 进程的用户名和组名,可以是 UID 或 GID 号
User nobody
Group nobody

# Port: 绑定的端口。如果端口小于 1024,则需要使用 root tinyproxy
Port 8888

# Listen: 监听的网卡设备,默认为所有,即 0.0.0.0
#Listen 192.168.0.1

# Bind: This allows you to specify which interface will be used for
# outgoing connections.  This is useful for multi-home'd machines where
# you want all traffic to appear outgoing from one particular interface.
#Bind 192.168.0.1

# BindSame: If enabled, tinyproxy will bind the outgoing connection to the
# ip address of the incoming connection.
#BindSame yes

# Timeout: 一个连接在被 tinyproxy 关闭之前允许处于不活动状态的最大秒数。
Timeout 600

# ErrorFile: 定义发生给定 HTTP 错误时要发送的 HTML 文件。 您可能需要为您的特定安装自定义位置。 通常要检查的位置是:
#   /usr/local/share/tinyproxy
#   /usr/share/tinyproxy
#   /etc/tinyproxy
#ErrorFile 404 "/usr/local/share/tinyproxy/404.html"
#ErrorFile 400 "/usr/local/share/tinyproxy/400.html"
#ErrorFile 503 "/usr/local/share/tinyproxy/503.html"
#ErrorFile 403 "/usr/local/share/tinyproxy/403.html"
#ErrorFile 408 "/usr/local/share/tinyproxy/408.html"

# DefaultErrorFile: 如果没有使用 ErrorFile 关键字为发生的 HTTP 错误定义 HTML 文件,则发送的 HTML 文件。
DefaultErrorFile "/usr/local/share/tinyproxy/default.html"

# StatHost: 这将配置被视为统计主机的主机名或 IP 地址:每当收到对该主机的请求时,Tinyproxy 将返回一个内部统计页面,而不是将请求转发到该主机。 StatHost 的默认值为 tinyproxy.stats。
# 通过在 /etc/hosts 添加配置在浏览器中直接访问
# 代理IP地址 tinyproxy.stats
#StatHost "tinyproxy.stats"


# StatFile:向 stathost 发出请求时发送的 HTML 文件。 如果此文件不存在,则在 tinyproxy 中硬编码基本页面。
StatFile "/usr/local/share/tinyproxy/stats.html"

# LogFile:允许您指定应记录信息的位置。 如果您希望登录到 syslog,请禁用此功能并启用 Syslog 指令。 这些指令是相互排斥的。 如果既没有指定 Syslog 也没有指定 LogFile,则输出到 stdout。
LogFile "/usr/local/var/log/tinyproxy/tinyproxy.log"

# Syslog: 告诉 tinyproxy 使用 syslog 而不是日志文件。 如果正在使用 Logfile 指令,则不得启用此选项。 这两个指令是互斥的。
#Syslog On

# LogLevel: Warning
# Set the logging level. Allowed settings are:
#       Critical        (least verbose)
#       Error
#       Warning
#       Notice
#       Connect         (to log connections without Info's noise)
#       Info            (most verbose)
# LogLevel 从设置级别及更高级别记录。 例如,如果将 LogLevel 设置为 Warning,则将输出从 Warning 到 Critical 的所有日志消息,但会抑制 Notice 及以下的消息。
LogLevel Info

# PidFile: 将主要 tinyproxy 线程的 PID 写入此文件,以便将其用于信号目的。 如果未指定,则不会写入 pidfile。
PidFile "/usr/local/var/run/tinyproxy/tinyproxy.pid"

# XTinyproxy: 告诉 Tinyproxy 包含 X-Tinyproxy 标头,其中包含客户端的 IP 地址。
#XTinyproxy Yes

# Upstream:
#
# 打开上游代理支持。
#
# 上游规则允许您根据正在访问的站点的主机/域有选择地路由上游连接。
#
# 语法: 上游类型 (user:pass@)ip:port ("domain")
# 或:     upstream none "domain"
# 括号中的部分是可选的。
# 可能的上游类型类型有 http、socks4、socks5、none
#
# 举例:
#  # 与测试域的连接通过 testproxy
#  upstream http testproxy:8008 ".test.domain.invalid"
#  upstream http testproxy:8008 ".our_testbed.example.com"
#  upstream http testproxy:8008 "192.168.128.0/255.255.254.0"
#
#  # 使用基本身份验证的上游代理
#  upstream http user:pass@testproxy:8008 ".test.domain.invalid"
#
#  # 内部网站和不合格主机没有上游代理
#  upstream none ".internal.example.com"
#  upstream none "www.example.com"
#  upstream none "10.0.0.0/8"
#  upstream none "192.168.0.0/255.255.254.0"
#  upstream none "."
#
#  # connection to these boxes go through their DMZ firewalls
#  upstream http cust1_firewall:8008 "testbed_for_cust1"
#  upstream http cust2_firewall:8008 "testbed_for_cust2"
#
#  # default upstream is internet firewall
#  upstream http firewall.internal.example.com:80
#
# 您也可以使用 SOCKS4/SOCKS5 上游代理:
#  upstream socks4 127.0.0.1:9050
#  upstream socks5 socksproxy:1080
#
# The LAST matching rule wins the route decision.  As you can see, you
# can use a host, or a domain:
#  name     matches host exactly
#  .name    matches any host in domain "name"
#  .        matches any host with no domain (in 'empty' domain)
#  IP/bits  matches network/mask
#  IP/mask  matches network/mask
#
#Upstream http some.remote.proxy:port

#
# MaxClients:这是将创建的绝对最大线程数。 也就是说,只能同时连接MaxClients个客户端。
#
MaxClients 100

#
# Allow: 匹配允许哪些客户端连接,如果存在一条 Allow,则不匹配的将直接拒绝。
#
# 控件的顺序很重要。 所有传入的连接都根据基于顺序的控件进行测试。
#
#Allow 127.0.0.1
#Allow ::1

# BasicAuth:用于访问代理的 HTTP "Basic Authentication"。 如果指定了任何条目,则仅向经过身份验证的用户授予访问权限。
BasicAuth user password

#
# AddHeader: 将指定的标头添加到 Tinyproxy 发出的传出 HTTP 请求。 请注意,此选项不适用于 HTTPS 流量,因为 Tinyproxy 无法控制交换的标头。
#
#AddHeader "X-My-Header" "Powered by Tinyproxy"

#
# ViaProxyName: HTTP RFC 需要 Via 标头,但使用真实主机名是一个安全问题。 如果启用了以下指令,则提供的字符串将用作 Via 标头中的主机名; 否则,将使用服务器的主机名。
#
ViaProxyName "tinyproxy"

#
# DisableViaHeader: 当设置为 yes 时,Tinyproxy 不会将 Via 标头添加到请求中。 这实际上将 Tinyproxy 置于隐身模式。 请注意,RFC 2616 要求代理设置 Via 标头,因此启用此选项会破坏合规性。 除非您知道自己在做什么,否则不要禁用 Via 标头...
#
#DisableViaHeader Yes

#
# Filter: 这允许您指定过滤器文件的位置。
# 下面是 filter 文件的示例
# # filter exactly cnn.com
# ^cnn\.com$
#
# # filter all subdomains of cnn.com, but not cnn.com itself
# .*\.cnn.com$
#
# # filter any domain that has cnn.com in it, like xcnn.comfy.org
# cnn\.com
#
# # filter any domain that ends in cnn.com
# cnn\.com$
#
# # filter any domain that starts with adserver
# ^adserver
#Filter "/usr/local/etc/tinyproxy/filter"


# FilterURLs: 将连接的 URL 而不是默认的 domain 进程匹配。
#FilterURLs On

# FilterExtended: 使用 POSIX 扩展的正则表达式而不是 Basic 正则。
#FilterExtended On


# FilterCaseSensitive: 使用区分大小写的正则表达式。
#FilterCaseSensitive On

# FilterDefaultDeny: 更改过滤系统的默认策略。 如果此指令被注释掉,或者设置为 No,则表示只禁用 Filter 文件匹配到的连接,未匹配到的允许连接。
# 如果配置为 Yes,则表示只允许 Filter 文件匹配到的连接,未匹配的将禁用。
# 也就是说: Yes 是白名单, No (默认) 是黑名单。
#FilterDefaultDeny Yes

# Anonymous: 如果存在 Anonymous 关键字,则启用匿名代理。The headers listed with `Anonymous` are allowed through, while all others are denied. 如果不存在 Anonymous 关键字,则允许所有标头通过。 您必须在 Header 周围加上引号。
#
# 大多数网站都需要启用 Cookie 才能正常工作,因此如果您访问这些网站,则需要允许 Cookies 通过。
#
#Anonymous "Host"
#Anonymous "Authorization"
#Anonymous "Cookie"

#
# ConnectPort: 这是使用 CONNECT 方法时 tinyproxy 允许的端口列表。 要完全禁用 CONNECT 方法,请将值设置为 0。如果未找到 ConnectPort 行,则允许所有端口。
#
# SSL 使用以下两个端口。
#
#ConnectPort 443
#ConnectPort 563

#
# 配置一个或多个 ReversePath 指令以启用反向代理支持。 使用反向代理可以使多个站点看起来好像它们是单个站点的一部分。
#
# 如果您取消注释以下两个指令并在您自己的计算机上的端口 8888 上运行 tinyproxy,您可以使用 http://localhost:8888/google/ 访问 Google 和使用 http://localhost:8888/wired/news/ 访问有线新闻。 除非您取消注释 ReverseMagic,否则它们都不会真正起作用,因为它们使用绝对链接。
#
#ReversePath "/google/" "http://www.google.com/"
#ReversePath "/wired/"  "http://www.wired.com/"

#
# 当使用 tinyproxy 作为反向代理时,强烈建议通过取消注释下一个指令来关闭普通代理。
#
#ReverseOnly Yes

# 使用 cookie 跟踪反向代理映射。 如果您需要反向代理具有绝对链接的站点,您必须取消注释。
# 这里的意思是通过 cookie 来区分反向代理,需要配合 ReverseBaseURL 使用。
#ReverseMagic Yes

# 用于访问此反向代理的 URL。 该 URL 用于重写 HTTP 重定向,以便它们不会转义代理。 如果您有反向代理链,则需要将最外层的 URL 放在这里(最终用户在他/她的浏览器中键入的地址)。
# 如果未设置,则不会发生重 rewrite 302。
#ReverseBaseURL "http://localhost:8888/"
测试
# 观察出网 IP
curl -x http://username:password@ip:port https://ifconfig.me
HTTP(s) by MITM
原理
代理服务器工作,从 TCP 流中获取 HTTP(s) 协议的目标 Host 信息,将流量转发到目标地址:
- HTTP 协议,从 Header 中获取目标 Host
- HTTPS 协议,从 SNI 中获取目标 Host
特性
- 利用中间人攻击的原理实现的代理
- 同时支持 HTTP / HTTPS (未启用 ESNI/ECH 情况)
- 客户端需要配置自定义 DNS 或者 iptable 将流量打到代理服务器
- 服务端看到的 Client IP 是代理服务器的 IP
客户端
自定义 DNS (如 dnsmasq)。这里简单通过 /etc/hosts 进行配置,假设我们要代理 ifconfig.me。
代理服务器IP ifconfig.me服务端
Nginx
参考:博客
包管理器安装
# CentOS / EPEL / Fedora
yum install nginx
# Debian / Ubuntu
apt-get install nginx
配置
stream {
  server {
    listen 443;
    ssl_preread on;
    resolver 8.8.8.8;
    proxy_pass $ssl_preread_server_name:$server_port;
  }
}

http {

  # include /etc/nginx/conf.d/*.conf;

  server {
    listen 80 default_server;
    resolver 8.8.8.8;
    location / {
      proxy_pass $scheme://$host$request_uri;
      # 以下两个都不需要,做的不是透明代理
      # proxy_bind $remote_addr transparent;
      # proxy_set_header Host $host;
    }
  }
}
应用配置
nginx -s reloadDocker 方式
docker 配置 nginx.conf 文件
user  nginx;
worker_processes  auto;

error_log  /var/log/nginx/error.log notice;
pid        /var/run/nginx.pid;


events {
    worker_connections  1024;
}


stream {
    log_format main '$remote_addr  [$time_local] $ssl_preread_server_name '
                     '$protocol $status $bytes_sent $bytes_received '
                     '$session_time';
    access_log  /var/log/nginx/access.log  main;

    server {
        listen 443;
        ssl_preread on;
        resolver 8.8.8.8;
        proxy_pass $ssl_preread_server_name:$server_port;
    }
}


http {
    include       /etc/nginx/mime.types;
    default_type  application/octet-stream;

    log_format  main  '$remote_addr - $remote_user [$time_local] "$request" '
                      '$status $body_bytes_sent "$http_referer" '
                      '"$http_user_agent" "$http_x_forwarded_for"';

    access_log  /var/log/nginx/access.log  main;

    sendfile        on;
    #tcp_nopush     on;

    keepalive_timeout  65;

    #gzip  on;

    #include /etc/nginx/conf.d/*.conf;

    server {
        listen 80 default_server;
        resolver 8.8.8.8;
        location / {
            proxy_pass $scheme://$host$request_uri;
            # 以下两个都不需要,做的不是透明代理
            # proxy_bind $remote_addr transparent;
            # proxy_set_header Host $host;
        }
    }

}
docker 启动命令
# 启动
docker run --name nginx-proxy -p 80:80 -p 443:443 -p 563:563 -v $(pwd)/nginx.conf:/etc/nginx/nginx.conf:ro -d nginx # 后台运行
# 删除停止(后台运行时)
docker rm -f nginx-proxy
测试
前置条件:参见客户端配置 ,配置 /etc/hosts
# 观察出网 IP
curl -v https://ifconfig.me
curl -v http://ifconfig.me
配置只代理指定域名
- https by map
- http by server_name: 博客 | 官方
下文以只代理 google.com 为例。
user  nginx;
worker_processes  auto;

error_log  /var/log/nginx/error.log notice;
pid        /var/run/nginx.pid;


events {
    worker_connections  1024;
}


stream {
    log_format main '$remote_addr  [$time_local] $ssl_preread_server_name '
                     '$protocol $status $bytes_sent $bytes_received '
                     '$session_time';
    access_log  /var/log/nginx/access.log  main;

    map $ssl_preread_server_name $name {
        google.com google.com;
    }

    server {
        listen 443;
        ssl_preread on;
        resolver 8.8.8.8;
        proxy_pass $name:$server_port;
    }
}

http {
    include       /etc/nginx/mime.types;
    default_type  application/octet-stream;

    log_format  main  '$remote_addr - $remote_user [$time_local] "$request" '
                      '$status $body_bytes_sent "$http_referer" '
                      '"$http_user_agent" "$http_x_forwarded_for"';

    access_log  /var/log/nginx/access.log  main;

    sendfile        on;
    #tcp_nopush     on;

    keepalive_timeout  65;

    #gzip  on;

    #include /etc/nginx/conf.d/*.conf;

    server {
        listen 80;
        resolver 8.8.8.8;

        server_name google.com;
        location / {
            proxy_pass $scheme://$host$request_uri;
            # 以下两个都不需要,做的不是透明代理
            # proxy_bind $remote_addr transparent;
            # proxy_set_header Host $host;
        }
    }

    server {
        listen       80 default_server;

        location / {
            return 404;
            root   /usr/share/nginx/html;
            index  index.html index.htm;
        }

        error_page   500 502 503 504  /50x.html;
        location = /50x.html {
            root   /usr/share/nginx/html;
        }
    }
}